Mixpanel

 photo HilaryStoneSoupHeader-ABOUT.png photo HilaryStoneSoupHeader-RECIPES.png photo HilaryStoneSoupHeader-TRAVELGUIDES.png photo HilaryStoneSoupHeader-ESSENTIALS.png photo HilaryStoneSoupHeader-CONTACT.png

Friday, February 28, 2014

Grapefruit Brûlée

Hello friends!  I hope you have been surviving this week. Last weekend was absolutely glorious here in DC, and I was hoping the good weather would be here to stay. Unfortunately, the polar vortex decided to revisit the East Coast, so spring will not be here for at least another week.

One of the good things about winter (besides hot chocolate, snowmen, and cuddling by the fireplace of course) is the abundance of great citrus that pops up around this time of year. Grapefruit often gets overlooked when compared to blood oranges or the cute little tangerines I spy at the grocery store. Grapefruit is certainly more of a time investment--it is easy to eat an orange on the go, but a grapefruit requires some patience and time as you cut out each individual section.

This grapefruit brûlée recipe will certainly make you rethink your decision next time you skip over the grapefruit at the grocery store. First, the sugar makes the grapefruit a little more appealing to those who still have not graduated to eating plain grapefruit yet. Secondly, this recipe will impress any guest you have over for brunch thanks to the caramelized top, even though all you did was stick the grapefruit in the oven!

Impressive yet simple, that's my MO.

Happy weekend---hoping you have lots of warmth and sunshine, no matter where you are in the world!

Grapefruit Brûlée

Adapted from Bon Appétit Magazine
Four servings

2 grapefruits, halved crosswise
4 tablespoons raw sugar

  • Trim 1/4 to 1/2 inch of peel from the bottom of each grapefruit half to stabilize the fruit and prevent it from rocking back and forth.
  • Place grapefruit, cut side down, on a paper towel, and let it sit for 5 minutes.

  • Invert grapefruit, and sprinkle each half with one tablespoon of sugar.  Try to make sure the sugar is distributed evenly!
  • Preheat your broiler and place your grapefruit cut side up on a baking sheet lined with aluminum foil.


  • Broil grapefruit, watching closely, until the sugar is melted and beginning to turn dark amber, about 8 minutes.
  • Let grapefruit cool slightly before serving. 


Tuesday, February 25, 2014

Back to Basics: Eggs over Easy


Breakfast is probably my favorite meal of the day. I could eat eggs, french toast, pancakes, and any other early-morning food at really any point in the day.

For me, eggs are only perfect if they are have a wonderfully runny yolk to mop up with toast. My grandmother and sister were infamous for hating runny eggs. I never quite understood the appeal of an egg over hard. Though my grandmother, stubborn as she was, never outgrew her distaste for runny yolks, I am so glad my sister and I have similar egg preferences now...it makes it so much easier to share when we go out for brunch!

These eggs, eggs over easy, are fried eggs that have been cooked on both sides, but still retain the perfect bright yellow soft yolk. Not only are these eggs a great way to start the day, they work perfectly on top of brown rice, greens, or in a sandwich for dinner.

I know it's a Tuesday. You're probably going to rush out the door on your way to work with just a cup of coffee and a banana in hand. I challenge you though to sit down one day this week and eat a real breakfast. Eating a real breakfast during the week, even though it only takes about 10 minutes, feels so luxurious, and the extra protein will keep you powering through those Excel and PowerPoint slides until lunchtime. 

Hope these spruce up your typical breakfast routine!

Eggs over Easy

1 tablespoon butter
1 egg

Over low heat, melt the butter in a small saucepan.  

When the butter begins to foam, crack the egg into the pan.

Cook over low heat until the whites become opaque.
When the whites are opaque, jiggle the pan to loosen the egg.  

Using a spatula, gently flip the egg over.  Cook the egg for 10 seconds.

After 10 seconds, serve the egg with toast.

Friday, February 21, 2014

Back to Basics: Roasted Salmon


Some days, I want nothing more than to come home and collapse. This whole week, I have felt one step behind on everything. My to-do list keeps managing to get longer instead of shorter, and there never seem to be enough hours in the day. There are some days where I do not get home until 7:30pm/8pm or so, and all I want is a chef to make me a homemade meal, and a cleaning staff to take care of the kitchen afterwards.
Instead, I am left either with a box of take-out or staring at a fridge with no idea what to make. Luckily, this salmon recipe is healthy, simple to make, and easy to clean up.  I pair it with leftovers in my fridge (salad, quinoa, roasted veggies, leftover pesto, etc) to make a full meal. This recipe is plain, but an essential recipe to have up your sleeve.

So while I cannot bring a chef to your door on the nights you work late, I can bring you a delicious recipe that is ready in under 15 minutes.

Roasted Salmon

Makes enough for one serving
1 3 oz fillet of salmon
Salt
Pepper

  • Preheat oven to 350 degrees.
  • Season salmon with salt and pepper. 
  • Place fish, skin side down, on a non-stick cooking sheet. Cook in the oven for 6-8 minutes.  
  • The salmon should flake well when done, and be very firm.

Tuesday, February 18, 2014

Thai Green Curry

Happy Tuesday everyone! I hope your week has been off to a great start. In just three more days, it will be the weekend again, where you can go back to relaxing in pajamas all day, drinking coffee in bed, and exploring your wonderful city.

In the meantime, you need to survive three days of work.  And if you're anything like me, it's not just work, but also the gym, grocery shopping, learning French, reading for my book club, and volunteering. Tuesdays are typically the toughest in terms of trying to get everything done because I spend 2.5 hours in the early evening at BUILD, a national non-profit. I rush to get into work early so I can finish work by 4:30pm, spend 4:30pm-7pm at BUILD, and then often go to the gym afterwards. By the time I get home from BUILD, I am ready for bed.

And that's where this Thai Green Curry comes in. Ready in less than 20 minutes, this curry is flavorful, healthy, and best of all, great for lunch the next day.

Thai Green Curry

1 tablespoon canola oil
1/2 onion, chopped
1 package green curry paste
1 1/2 cups chicken broth
1 cup canned coconut milk
1 sweet potato, diced
Juice from one lemon
1 teaspoon fish sauce
1.5 cans chickpeas, rinsed
1 bell pepper, diced
Prepared brown rice or white rice

  • In a saucepan, heat the oil over medium heat.  Add in the chopped onions, and stir occasionally until they start to wilt.   
  • Next, add in the curry paste, and let it heat up for about 30 seconds.
  • Pour in the chicken broth and coconut milk.  Stir in the sweet potatoes, lime juice, and fish sauce.  Let the sauce simmer on medium heat until the sweet potatoes are tender. 
  •  Then, add in the chickpeas and the chopped bell pepper.  Cook over medium heat until heated thoroughly. The bell peppers should still have a little bit of crunch to them!
  • Serve with brown or white steamed rice.  

Saturday, February 15, 2014

Butternut Squash and Goat Cheese Frittata

Every year, Zach surprises me on Valentine's Day with Nutella, strawberries, and mimosas in bed. Now that we live on opposite coasts, I find myself clinging to little traditions like this. This year, I was hoping since Zach was going to be in town for Valentine's Day, he would find a way to recreate this special tradition.

Then Storm Pax happened, and Zach's flight was delayed until Saturday morning.  So long Valentine's Day tradition of decadent breakfast in bed. I took the news by moping around and feeling sorry for myself.  After a day of being very annoying, I came to understand that change is natural, and though traditions are meant to tie us to the past, they can also adopt to our lives now.

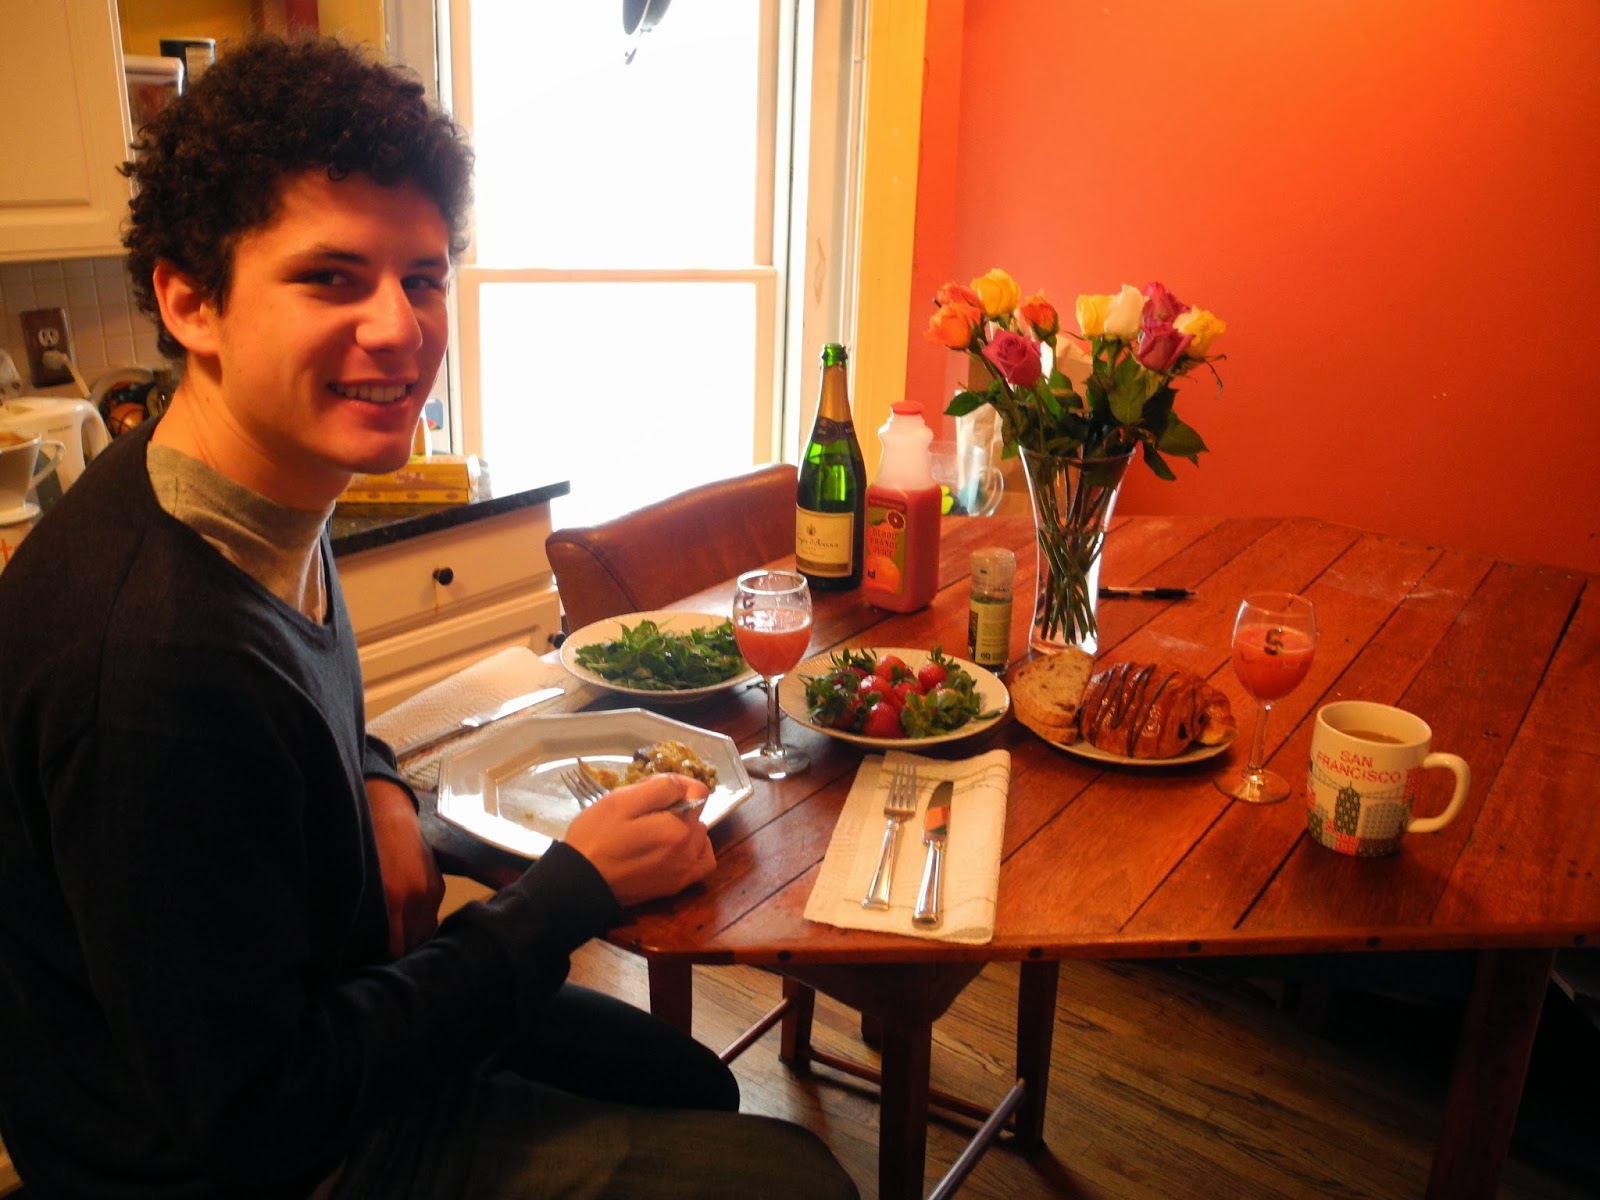
So this morning, I woke up early, went to the store, and bought the ingredients for a great brunch at home. I kept with our traditional theme of strawberries and mimosas-but had to make a few changes to add my own flair (and to adjust for Whole Foods choosing not to carry Nutella...really Whole Foods?). 

I ended up surprising Zach with blood orange mimosas, Philz Tesora coffee, strawberries, croissants, an arugula salad, and butternut squash, onion, and goat cheese frittata. The menu was different from how we typically celebrate Valentine's Day, and we were not celebrating on Valentine's Day, but it was still lovely and romantic.

This frittata is an easy brunch dish to throw together--especially if you cook the butternut squash the day before.  

Hope you all are having a lovely weekend with your Valentines!

Butternut Squash and Goat Cheese Frittata

3/4 cup butternut squash, diced into cubes
2 tablespoons of olive oil
2 teaspoons salt, divided
2 teaspoons black pepper, divided
1 tablespoon butter
1/2 onion, chopped
3 ounces of goat cheese (feel free to add more)
6 eggs
1/2 cup whole milk

  • Heat oven to 350 degrees. 
  • Toss the butternut squash with olive oil, one teaspoon of salt, and one teaspoon of black pepper. Bake in the oven, turning the squash occasionally with a spatula, for 30 minutes, or until the squash is tender. Leave the oven on--you are going to need it again soon!
  • Meanwhile, in a small pan on medium heat, melt the butter.  Add onions, and cook, stirring frequently, until the onions are soft and beginning to brown.
  • Spray an 8x8 in. Pyrex dish with cooking spray. Layer the squash, onions, and goat cheese in the dish.
  • In a medium sized bowl, whisk the 6 eggs, and remaining salt and pepper together.  Add in the milk, and whisk again.
  • Pour the egg mixture into the Pyrex dish.
  • Bake for 18-20 minutes, or until the eggs are completely set on top. The frittata should look similar to very firm scrambled eggs.


Monday, February 10, 2014

Faux Pho


This post was originally supposed to be about pesto because I had a ton of basil and parmesan cheese. But then I realized making pesto would have required a trip to the store for some pine nuts. Poking around my kitchen a little bit longer, I discovered some rice noodles tucked behind my cereal, and some chicken soup in my freezer.

And that is how my faux pho came to be. With a few ingredients, you can easily elevate chicken soup into something a little more exciting and fresh. It is not necessarily the most traditional, but it will curb your pho cravings until you can make it out to your favorite hole-in-the-wall restaurant.

Perhaps the best thing about this meal is that is was ready in 15 minutes. Seriously! Which means you have plenty of time to unwind after a busy Monday back at the office...

Faux Pho

I used frozen homemade chicken soup, that already had carrots and chicken in it.  If you don't have any, feel free to use store-bought low-sodium broth and rotisserie chicken.  To make it vegetarian, simply sub the chicken broth and chicken for veggie broth and tofu!

Handful of rice noodles (feel free to grab as much as you want)
4 cups of chicken broth
1/2 cup shredded rotisserie chicken
1/4 onion, chopped
1/3 cup chopped fresh basil
Juice from 2 limes
1 tablespoon soy sauce
1 tablespoon fish sauce
Siracha
  • Cover the noodles with boiling water.  Let sit for approximately 7-10 minutes.  I prefer my noodles on the chewier side, so I err on 7 minutes.  
  • Drain noodles when done.
  •  Combine broth and chicken in a pot, and heat over medium-high heat.  Add in chopped basil, lime juice, and onions.  Continue to cook until the soup is hot.
  • Stir in soy sauce and fish sauce.
  • To serve, place noodles in a bowl.  Add soup on top, and then add Siracha. 

Sunday, February 9, 2014

Valentine's Day Pizza Party

I am a big fan of stay-at-home date nights. I love going out to eat and trying new restaurants, but sometimes there is nothing more romantic than staying at home, cooking a delicious meal together, and then cuddling for the rest of the night. When I think of date nights, it conjures up ideas of fancy meals that might take a few hours to make, but I am much more partial to interactive and fun meals that are simpler to make.

These pizzas are one of my favorite weeknight date-night meals. Not only are they incredibly easy to make thanks to Trader Joe's, but they are also so much fun to put together. This is a great meal to put together for Valentine's Day--especially since everyone will be celebrating on Friday after a long week at work.

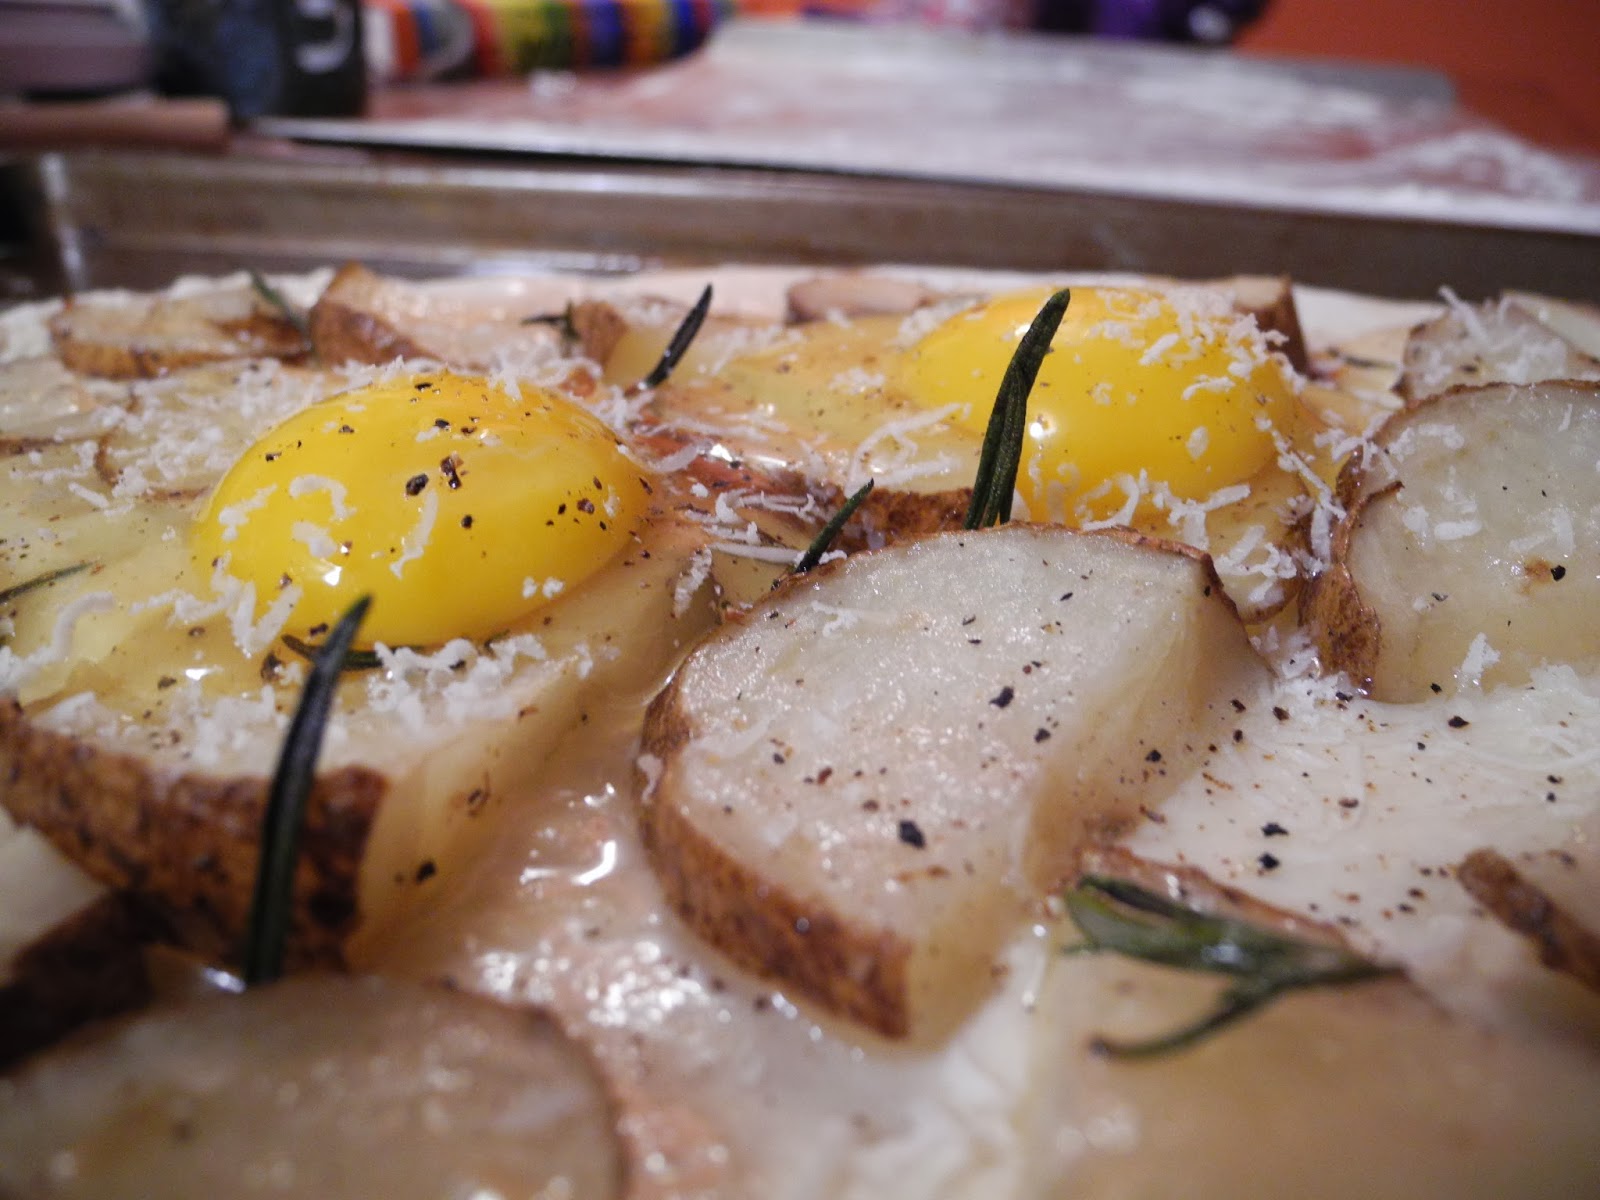
My friend Kara and I made three pizzas--fig, goat cheese, prosciutto, and arugula pizza, margherita pizza, and potato, egg, and rosemary pizza.  Feel free to customize!  For example, Kara loves prosciutto, so she add that to her fig and goat cheese pizza, while I was more partial to the potato, egg, and rosemary pizza.

Open up a bottle of wine, start rolling out the dough, and great ready for a great date night.

Weeknight Pizzas

Feel free to use whatever ingredients you like, and whatever amounts of topping you like, which is why I do not specify certain amounts of topping.  Use your creativity...the options are endless!  
1 potato
1 1/2 teaspoon salt
1 1/2 teaspoon pepper
1 1/2 tablespoons rosemary
3 packages of Trader Joe's pizza dough
Flour, for rolling out the dough
Olive oil
Fig butter
Goat cheese
Prosciutto (optional)
Arugula
Basil
Burrata cheese
Two eggs
Parmesan cheese

  • Let the pizza dough rest at room temperature for 20 minutes.
  • Meanwhile, cut the potato into small slices.  Toss with two tablespoons of olive oil, 1/2 teaspoon of salt, 1/2 teaspoon of pepper, and 1/2 tablespoon of rosemary. Bake in the oven at 350 degrees until the potatoes are soft and begin to turn brown. Set aside to cool.
  • Preheat the oven to 450 degrees.
  • Toss a cutting board with some flour.  Using a rolling pin, begin rolling out the pizza dough until the crust is approximately one inch thick.  Go for any shape you want--though rectangles and circles are the easiest and most traditional.
  • Once you have three crusts ready to go, coat three cooking sheets with olive oil.
  • For Kara's fig, goat cheese, prosciutto and arugula pizza, first coat the pizza with fig butter.  Then top with goat cheese chunks and a few slices of prosciutto.   

  • Place in the oven and let it cook for 15 minutes.  Depending on how thin your pizza is, it may take longer.  You want to make sure the dough seems crispy and and the edges are nicely brown.
  • Top the pizza with arugula before serving.  

  • For my margherita pizza, top the pizza dough with marinara sauce and fresh basil.  

  • Place in the oven, and let it cook for 15 minutes, until the edges of the dough is nicely browned. 
  • Top the pizza with fresh buratta right before serving.

  • For my potato, egg, and rosemary pizza, coat the pizza dough with olive oil.  Place the cooked potatoes onto the dough, creating a single layer. Crack two eggs onto the pizza.  Add the remaining salt, pepper, and rosemary, and grate a little bit of Parmesan over the pizza.  
  • Cook in the oven until the egg is set and the edges are crisp, about 12-15 minutes. 


design + development by kelly christine studio