Mixpanel

 photo HilaryStoneSoupHeader-ABOUT.png photo HilaryStoneSoupHeader-RECIPES.png photo HilaryStoneSoupHeader-TRAVELGUIDES.png photo HilaryStoneSoupHeader-ESSENTIALS.png photo HilaryStoneSoupHeader-CONTACT.png
Showing posts with label dinner. Show all posts

Wednesday, September 16, 2015

Brie and Honey Butter Sandwiches with Homemade No-Knead Bread

Brie and Honey Butter Sandwich

There’s no other way to say it: you got to make this sandwich, and you better do it with homemade bread. The sandwich is so simple that every ingredient counts, and this is no place to skimp on quality or calories! 

Speedy No Knead BreadThe sandwich is just bread, brie, honey, and butter, but it’s a heavenly combination that you can use on repeat. At tea parties, picnics, or just as a Sunday afternoon snack, there’s no place this sandwich doesn’t fit it (unless you are maybe going to a picnic with a friend who is both dairy AND gluten-free, which in this case, why are you eating a meal with this person?!?!). 

Brie and Honey Butter Sandwich

Z and I had this sandwich at Shed, and it was so delicious that we wanted to recreate it at home. I’m glad we did! It forced me to try the speedy no-knead bread recipe from The Times. I like the speedy recipe compared to the original because it allows for more flexibility; no waiting a full 24 hours here. It’s one of the simplest recipes around, and one of the greatest dinner party tricks. “Hi friends, you made a salad, that’s cool, well I made BREAD”. No need for your friends to know that the salad was probably harder to make than this loaf of bread. 

Is it the most perfect bread loaf around? No. But it’s pretty delicious and goes great with cheese, so make sure to stock your fridge with Brie!

Brie and Honey Butter Sandwiches with Speedy No-Knead Bread

From The New York Times

For Bread:
3 cups bread flour
1 packet instant yeast
1 1/2 teaspoons of salt
Oil as needed

For Sandwiches:
Serves 2, adjust as necessary

2 tablespoons softened butter
1 1/2 teaspoons honey, plus more for drizzling
6 thin slices of brie (3 for each sandwich)
2 slices of bread (use 4 if you want it to be a closed sandwich, but I prefer open-face here)

Combine flour, yeast, and salt in a bowl. Add 1 1/2 cups water, stir until blended. The dough will be shaggy. Cover dough with plastic wrap, and let it sit for 4 hours at warm room temperature, about 70 degrees. 

Lightly oil a work surface, and place dough on it. Fold the dough onto itself once or twice. Cover loosely with plastic wrap and let sit for 30 minutes. 

Speedy No Knead Bread

Immediately start heating up the oven, setting it to 450 degrees. Put a heavy 6-8 quart heavy pot in the oven. When the dough is done resting, carefully remove the pot from the oven. Put the dough into the oven, seam side up. Shake the pan once or twice. 

Cover the pan with a lid, and bake for 30 minutes. Remove lid, and back for another 15-30 minutes, until loaf is beautifully browned. Cool pot on a rack, then take out bread and slice.

Speedy No Knead Bread

Combine honey and softened butter together in a small bowl. Spread the butter equally over the two slices of bread. Top with 3 slices of brie on each piece of bread, and drizzle more honey over if desired. Enjoy! 

Wednesday, September 2, 2015

Summer Salad with Basil, Blue Cheese, Corn, and Heirloom Tomatoes

Summer Salad with Basil, Blue Cheese, Corn, and Heirloom Tomatoes

I am in denial that summer is basically over, and that is why I'm serving up a recipe today with some of summer's best produce--heirloom tomatoes, sweet corn, basil, and arugula. Not to mention a hearty portion of blue cheese!

Summer Salad with Basil, Blue Cheese, Corn, and Heirloom Tomatoes

My friend A introduced me to this salad a few weeks ago. She stole the idea from her neighborhood salad/sandwich spot, and made it for me one night for dinner. I brought a big bowl of this salad to a potluck recently, and my friends devoured the salad quickly. Once you make it, you'll find yourself wanting it for dinner basically every night. Which isn't really a bad thing, since you'll only find these ingredients for maybe a few more weeks. So make this summer salad for dinner tonight.

Summer Salad with Basil, Blue Cheese, Corn, and Heirloom Tomatoes

As an adult, summer isn't quite as fun as it used to be. Living in the city means no friends with pools, working means no long summer vacations, and residing in San Francisco means piling on sweaters come June. Z and I will be escaping for a week to Hawaii very very soon, so we'll have to get our fill of warm weather, swimming, and vacation then, before the long grind to the holidays.

I'm thinking of fall recipes already--items for college football tailgates, Rosh Hashanah, and cozy Sunday night dinners. Before that though, let's make this salad over and over again, holding onto summer just a little bit longer.

Summer Salad with Basil, Blue Cheese, Corn, and Heirloom Tomatoes

Summer Salad with Basil, Blue Cheese, Corn, and Heirloom Tomatoes


2 ears of corn (white, yellow, bi-color--it doesn't matter!)
1/2 tablespoon of butter
4 cups of arugula, washed, rinsed, and dried
2 tablespoons balsamic vinegar
Salt
Pepper
2 medium-sized heirloom tomatoes, chopped
1/4 cup crumbled blue cheese
3 tablespoons chopped basil

Cut the kernels away from the corn cob. Melt the butter in a saucepan over medium-low heat, add the corn, and cook until just barely cooked (3-6 minutes, depending on the corn). You just want to lose the starchiness of the corn. 

Toss the arugula with balsamic vinegar. Sprinkle with salt and pepper according to taste. Add half the corn, tomatoes, blue cheese, and all of the basil. Toss and plate on a large serving platter. Top with the rest of the corn, tomatoes, and cheese. Enjoy!

Wednesday, August 26, 2015

Hot and Sour Soba Noodle Salad

Hot and Sour Soba Noodle

I've been keeping this soba noodle salad recipe a secret for a while now. I discovered it in via the New York Times back in March, and I quickly made these soba noodles my go-to dinner meal. I'm sorry for keeping such a delicious, easy, and healthy recipe a secret from you!

This recipe combines two of my favorite Asian flavors into one: gingery peanut sauce and hot and sour soup. My dad is famous for his peanut sauce recipe, which is always requested when my sister returns home from school. My family and I love hot and sour soup, and I still add a ton of vinegar into my soup because I'm convinced the soup is never sour enough. Clearly, any soba noodle recipe that combines the two is going to be a hit in my book. 

Z hates soba noodles (another article of proof that I must really love him, because who doesn't like soba noodles?), so I put this recipe into heavy rotation when Z was out of town. Since we rarely eat tofu when Z is home (surprise, surprise, he also doesn't like tofu), I used this as my opportunity to marinate some firm tofu in a gingery, garlic peanut paste, and added it on top.

Hot and Sour Soba Noodle

Soba noodles are made from buckwheat, and they have a strong nutty flavor. While they are typically not gluten free, you can sometimes find 100% buckwheat noodles which would be gluten free! 

Hot and Sour Soba Noodle Salad

Recipe via the NYTimes

Note: my version calls for a double amount of garlicky peanut paste that I use to marinate the tofu. Cut the paste in half if only making the noodles. 

Paste for Sauce:
4 tablespoons peanut butter
2 tablespoons soy sauce
4 tablespoons white wine vinegar
2-4 teaspoons red pepper oil (start with 2, and add more to taste)
Pinch of cayenne
2 large garlic cloves, minced
4 teaspoons minced fresh ginger
Salt
Fresh ground pepper to taste
2 tablespoons sesame oil

4 servings of tofu (drained and pressed to remove water)
2 tablespoons canola oil
1/2 cup vegetable broth or chicken broth
1/2 pound Japanese buckwheat noodles
1 cup diced cucumbers


For the paste: Heat the peanut butter for 10 to 15 seconds in a microwave. Combine with soy sauce, vinegar, red pepper oil, cayenne, garlic, ginger, salt, and pepper. Whisk together, and then whisk in sesame oil. 

Spread half of the mixture evenly over tofu, and place in fridge. Let marinate for at least 30 minutes, up to an hour. 

Hot and Sour Soba Noodle

Using remaining paste, whisk in canola oil and broth. Set aside. 

Bring large pot of water to boil, and then add the noodles. When water comes back to a boil, add a cup of cold water to the pot. Allow the water to come back to a boil, and then add another cup of cold water. Have water come to a boil again, and add a third cup of water. When the water comes to a boil, the noodles are done. 

Drain the noodles and toss immediately with the dressing. Add remaining ingredients, including tofu, and toss again. Serve immediately. 


Wednesday, August 5, 2015

Cheese & Fruit for Dinner

Cheese Dinner

Continuing with the theme of easy dinners, today I am sharing my favorite lazy, no-cook meal--bread, fruit, and cheese!

When I don't feel like cooking, I often head to the local co-op for some great cheese, ripe summer fruit, and fresh bread. It's a really filling meal, and thanks to the fruit, I can kind of convince myself that it is healthy.

In terms of cheese, Z and I are suckers for blue cheese and peaches. I prefer a creamier blue, while Z prefers a more crumbly blue. We typically end up settling on Point Reyes Original Blue, which is amazing!

Then, I add in two more types of cheese. In the fall, I'll do a sharp cheddar with apples. This spring, I've been eating a lot of brie and goat cheese though.

For fruit, anything ripe and in season should work well. Peaches, nectarines, cherries, and strawberries are constantly in our fruit/cheese/bread rotation.

Lastly, there's no point in eating great cheese if it doesn't have a great vehicle. We splurged for this shoot on Tartine bread, but any fresh baked bread will do.

This is the one "meatless" meal Z loves. While Z will never become a vegetarian, maybe I can convince him that every Monday should be our cheese/bread/fruit night.

What are your go-to easy meals? Share them in the comments below!


Wednesday, May 13, 2015

Lemon and Chive Compound Butter

Compound Butter Leave work at approximately 6:26pm. Walk to the metro. Wait 7 minutes for the next train (while listening to the latest episode of This American Life). Take the train for four stops. Walk three blocks to my apartment. Check the mail (nothing but catalogues). Make awkward small talk with neighbor in the elevator. Unlock the front door. Fling off uncomfortable work shoes. Plop down on the couch. Turn on How I Met Your Mother (don't judge--I'm late to the game on this one!). Eventually, muster the energy to make dinner...

Today, I am bringing you a recipe for compound, or flavored, butter. Please, don't feel cheated! Because this recipe is incredibly fabulous. When you have nights like I typically do (see above), you want an easy and delicious dinner. Just add a pat of this butter on to any meat/veggie you have on hand, and you've got a great meal

There is an endless number of things you can put this butter on. Grilled chicken, broiled salmon, a simple steak, microwave-able steamed veggies, roasted asparagus--basically, any protein and any vegetable.

It's easy to make--all it takes is a couple of ingredients, and no fancy techniques here! Plus, it's pretty customizable. Have oranges on hand instead of lemons? Have leftover thyme and no chives? Feel free to sub the citrus and herb based off of what you have on hand. 

It's one of the best and easiest ways to add flavor to any meal. Enjoy!

Lemon and Chive Compound Butter

8 tablespoons (1 stick) of butter, softened
1 teaspoon lemon zest
2 teaspoons lemon juice
1 tablespoon chopped fresh chive
Salt and pepper to taste

In a bowl, combine the ingredients together. Mash with a fork to ensure all the ingredients are incorporated.

Compound ButterCompound Butter

Place a 12-inch square of plastic wrap on the counter, and place the butter on top of the plastic wrap, leaving a 2-inch border. Shape the butter into a horizontal cylinder, about 8 inches long and 2 inches wide. Twist the ends of the plastic wrap in opposite directions to seal the butter, and then place in the fridge. Let the butter firm up, about 2 hours. Butter should keep for 3-5 days.

Compound Butter

Wednesday, May 6, 2015

Basil Green Goddess Salad with Avocado and Egg

Green Goddess Salad The thoughts that go through my head each weekend: Fresh vegetables! Flowers! Farmer's markets! Herbs! Spring! 

Z was in India recently, so I spent the weekend on my own. I spent one Saturday morning at the Noe Valley Farmers' Market, and I walked home with a boatload of fresh product, even though it was just me at home. I picked up a huge bunch of fresh basil and mint, in addition to butter lettuce, kale, and strawberries. 

As soon as I saw the basil butter lettuce, I knew I needed to make green goddess dressing. Green goddess dressing is a creamy dressing filled with basil, and it's wonderful during the spring and summer. 

This salad was the perfect thing to make when Z was gone. Z has a weird dislike of salad dressing. He never wants salad dressing, even on kale salad! When he's gone, it's time to experiment.

Green Goddess SaladThis salad dressing is wonderful during the spring. It is chock full of basil, so it's a great way to use up those herbs from the farmers' market. It does have anchovies in it, but don't leave them out! The anchovies lend an amazing flavor to this dish.

Don't be surprised if this becomes your new go-to salad dressing. It also works great as a dip for bread and crudites.
Green Goddess Salad

Basil Green Goddess Dressing

From Ina Garten

3 heads lettuce (Bibb or Butter lettuce)
Vegetable of choice (tomatoes or radishes work well, I used purple asparagus)
3 avocadoes
1 cup good mayonnaise
1 cup chopped scallions
1 cup chopped fresh basil
1/4 cup freshly squeezed lemon juice
2 teaspoons chopped garlic
2 teaspoons anchovy paste
2 teaspoons kosher salt
1 teaspoon freshly ground black pepper
1 cup Greek yogurt (or sour cream)
Hard-boiled eggs

Clean and dry the lettuce thoroughly, and then arrange the lettuce on a plate. Add your other vegetables and avocadoes. 

Green Goddess Salad
Combine the mayonnaise, scallions, basil, lemon juice, garlic, anchovy paste, kosher salt, and black pepper in a food processor until smooth. Add the Greek yogurt, and process just until blended. If not using immediately, then put the dressing in the refrigerator. Otherwise, drizzle the dressing onto your salad, and add the hard boiled eggs!
Green Goddess Salad


Thursday, April 23, 2015

Minty Pea Soup

Mint Pea Soup

Pea soup reminds me of my father and my grandmother. My dad actually hates peas; he refuses to eat them. And my grandmother probably never made this soup.

Mint Pea SoupApparently, my grandmother would buy canned peas, boil them to death, and then serve the boiled pea mush to my dad. No wonder my dad hates peas.

If my dad ate this soup growing up, he would like peas. Because this soup is delicious, fresh, and slightly creamy. It's perfect for the spring!

Z liked this recipe so much that he actually suggested we make it for dinner one night. Any time Z recommends a particular recipe, instead of just saying, "I don't know what I want for dinner, Hilary. Make anything," means that we have found a winner.

Mint Pea Soup
This soup is easy enough to make for dinner on a weeknight, I promise! I'm including the recipe with frozen peas, because who really has time to shell fresh peas?

Enjoy!

Mint Pea Soup

Mint Pea Soup

from Ina Garten

2 tablespoons unsalted butter
2 cups chopped leeks, white and green parts only (about 2 leeks)
1 cup chopped yellow onion
4 cups chicken stock
2 10-ounce packages of frozen peas
2/3 cup chopped fresh mint leaves, lightly packed
2 teaspoons kosher salt
1/2 teaspoon freshly ground black pepper
1/2 cup creme fraiche
1/2 cup freshly chopped chives

Heat the butter in a large saucepan. Add the leeks and the onion, and cook over medium-low heat for 5-10 minutes, until the onion is tender. Add the chicken broth, increase the heat to high, and bring to a boil. 

Mint Pea SoupAdd the peas and cook for 3-5 minutes, until the peas are tender. Off the heat, add the mint, salt, and pepper. 

Puree the soup in batches, one cup at a time, and pour the pureed soup into a large bowl. Whisk in the creme fraiche and chives, then taste for seasoning. Serve hot! Top with additional creme fraiche if you would like. 

Mint Pea Soup

Wednesday, April 15, 2015

Quinoa & Kale Pilaf

Kale and Quinoa Pilaf
Life recently has been getting the best of me. "Gym" has been a foreign word recently, and I break my no white sugar/flour M-Th rule pretty frequently. I've just felt...blah. There's no better way to put it. I'm in a funk, you now?

Kale and Quinoa PilafWhen I feel this way, I immediately reach for whole grains and vegetables. 

This recipe is great because it is so healthy, can be made in one pot, and it has a lovely lemony dressing. It's now a regular in our dinner routine!

Now, will this quinoa pilaf help me get to the gym? No. Still working on that one!

Kale and Quinoa Pilaf

From Food52

2 cups salted water
1 cup quinoa
1 bunch lacinato kale, chopped into 1" lengths
1 meyer lemon, zested and juiced
2 scallions, minced
1 tablespoon olive oil
3 tablespoons toasted pine nuts
1/4 cup crumbled goat cheese
Salt and pepper

Bring water to a boil in a covered pot. Add the quinoa, cover, and cook over medium-low heat for 10 minutes. Top with kale, and then re-cover. Simmer another 5 minutes, then turn off the heat, and then let sit for 5 minutes. 

While the quinoa is cooking, take a large bowl and combine the lemon zest/juice, scallions, olive oil, pine nuts, and goat cheese.
Kale and Quinoa Pilaf

Check the quinoa and kale mixture to make sure the water is absorbed, the quinoa is tender but firm, and the kale is bright green. Fluff the quinoa, and then dip the quinoa and kale into the bowl. Toss to combine, and season with salt and pepper.


Enjoy!

Thursday, March 26, 2015

Kale Lemon Pasta with Preserved Lemons

DSCN3855 Yesterday, we talked about preserved lemons. Today, I'm sharing with you a great way to use this unique condiment in a delicious and easy pasta dish.

One of the many reasons why I love pasta is because you can use up all of your leftover odds and ends and turn it into a wonderful meal. And that's exactly what this recipe does!

It's a lemony cream sauce pasta, but I promise it's not a heavy and gloopy sauce. The lemon juice and zest, in addition to the preserved lemon peel, elevates the dish and prevents it from feeling heavy.

Enjoy!

DSCN3867 Kale Lemon Pasta with Preserved Lemons

Inspired from Smitten Kitchen

1 pound spaghetti
Salt
1/4 cup olive oil
1 bunch of lacinato kale, chopped into one-inch pieces
3 lemons
1/4 cup heavy cream
1 ounce finely grated Parmesan cheese
1 1/2 tablespoons preserved lemons
Ground black pepper

Cook pasta in extremely salted water (it should taste like the ocean) until your pasta is al dente.

Meanwhile, when the pasta is cooking, heat olive oil in a pan over medium. Add the kale to the oil, and saute lightly. Add the juice from 3 lemons, in addition to 1 tablespoon of zest from your lemons. Then, add the heavy cream, and let it simmer to thicken the sauce.

Sauteed KaleDSCN3851

When the pasta is al dente, drain the water, reserving a 1/2 cup of the cooking liquid. Add the pasta to the pan with kale and cream sauce, in addition to the cooking liquid. Continue cooking on medium for a minute or two longer. 

Turn off the heat, adding the cheese, preserved lemons, and ground pepper.

Wednesday, March 11, 2015

Caramel Chicken

Caramel Chicken

There are lots of reasons to make this easy dinner dish, but the most important reason is the sauce. The sauce is incredibly addicting. It's a slightly sweet, vinegary, and gingery sauce studded with golden and caramelized garlic cloves. I could (almost) drink the sauce.

Caramel Chicken

This caramel chicken recipe from Bon Appetit is one of my favorites. It's easy to make– Z and I made this on a weekday night! Paired with some brown rice and a simple kale salad, it made for a delicious dinner.

Caramel Chicken
I'll admit...it's pretty easy to pick up Asian-inspired takeout in a mystery brown sauce. But you're left with mystery cuts of chicken in a thick and even more mysterious sauce with MSG. Next time you are tempted to get takeout, make this Vietnamese-inspired chicken dish instead!

Caramel Chicken

Caramel Chicken

From Bon Appetit Magazine
Serves 4

2 tablespoons vegetable oil
2 1/2 pounds bone-in, skin-on chicken legs and thighs
Kosher salt
8 garlic cloves, peeled
1/3 cup (packed) light brown sugar
1/4 cup unseasoned rice vinegar
2 slices 1/4" thick of peeled ginger
1 cup low-sodium chicken broth
1/4 cup reduced-sodium soy sauce
2 scallions, thinly sliced

Heat oil in a large and wide heavy pot over medium-high heat. Season chicken with salt, and working in two batches, cook the chicken until golden brown and crisp, 6-8 minutes per side. Transfer the chicken to a plate. 

Add garlic to the pot, and cook until golden brown, about 2 minutes. Transfer the garlic to the plate with the chicken. Pour off the fat from the pot. 

Return pot to medium-high heat and add 1/2 cup of water, scraping up the brown bits from the bottom of the pan. Add sugar, stir to dissolve, then cook until the mixture thickens and turns dark amber in color. Carefully add the vinegar.

Add ginger, broth, soy sauce, and then chicken (skin side up) and garlic. Bring to a boil, reduce heat, and simmer for 20-25 minutes. Make sure chicken is cooked through. Transfer chicken to another plate. 

Bring cooking liquid to a boil and cook until thick enough to coat the back of a spoon, about 10 minutes. Return chicken to pot, and toss to coat. Top with scallions and serve with rice!

Thursday, February 5, 2015

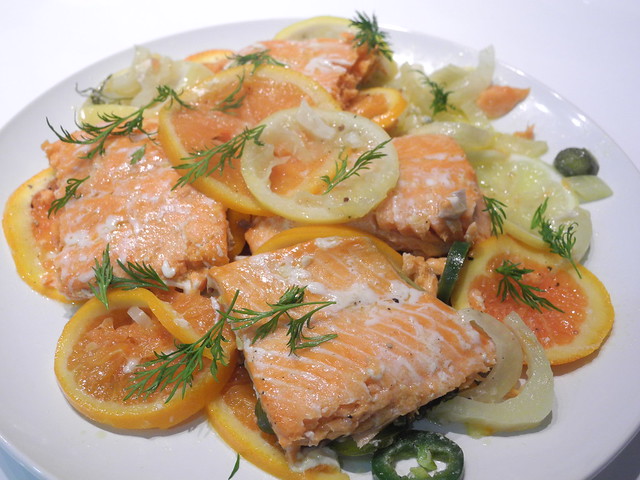
Slow Roasted Salmon with Citrus and Fennel

Slow Roasted Salmon With CitrusSlow Roasted Salmon With Citrus
Today, I'm bringing you a beautiful and delicious salmon dish. While I love the idea of serving it for Valentine's Day, it's really easy enough to recreate any day of the week. Why do you need a made-up commercial holiday as an excuse to make a great meal?

All this recipe takes is a little bit of time. It just requires some upfront vegetable slicing, and then you place the salmon in the oven and let it slowly roast.

Slow Roasted Salmon With Citrus
This is a great Valentine's Day dinner recipe--it seems fancy and elegant (salmon! roasted citrus! fennel!) but it really is simple to make, allowing you to spend more time with that certain someone. It also feels special--out of the ordinary--from the typical dinner routine. The salmon looks best when it's perfectly imperfect, so you don't have to worry about making it look picture perfect.

Zach and I are forgoing restaurants this Valentine's Day and you should too. I guarantee this salmon dinner is better than the prix-fixe menu with overdone steak. Pop open a bottle of wine, starting preparing some citrus, and enjoy the night in with your love!

Slow Roasted Salmon with Citrus and Fennel

From Bon Appetit 
Serves 6

1 medium fennel bulb, thinly slice
1 blood orange or navel orange, thinly sliced and seeds removed
1 Meyer or regular lemon, thinly sliced and seeds removed
1 red Fresno chile or jalapeño, thinly sliced
4 sprigs of dill, plus more for serving
Kosher salt
Freshly ground pepper
1 2-lb skinless salmon fillet, preferable center cut
3/4 cup olive oil
Flaky sea salt

Preheat oven to 275 degrees F. Toss fennel, orange slices, lemon slices, jalapeño, and dill together in a shallow baking dish. Season with kosher salt and pepper.

Season salmon with kosher salt and place on top of fennel and citrus mixture. Pour oil over the entire dish.

Slow Roasted Salmon With Citrus

Bake for 30 to 40 minutes, until salmon is just cooked through (the flesh will be opaque).

Transfer salmon to a large platter, breaking the fillet into large pieces. Spoon fennel and citrus mixture over the salmon. Discard cooked dill sprigs and add fresh dill. Season with flaky sea salt and more pepper.

Enjoy!

Thursday, October 16, 2014

Classic Grilled Cheese Sandwiches

grilled cheese and tomato soup
Today, I am sharing not one, but TWO recipes that a perfect pairing. Gooey and delicious grilled cheese sandwiches along with a hot bowl of tomato soup.

This classic comfort food pairing instantly makes me think of home. Growing up, grilled cheeses were part of our weekly dinner routine. They make a quick and easy dinner when you are running between events, or you simply don't feel like cooking.

While this recipe varies from the grilled cheeses my father made when I was younger, this recipe matches a classic diner grilled cheese.

Check back later today for my dairy-free but creamy tomato soup!

Grilled cheese

Grilled Cheese Sandwiches

Makes two sandwiches

3 oz of cheddar cheese, shredded
4 slices of white sandwich bread
2 tablespoons melted butter

Divide the cheese evenly between two of the slices of bread. Cover the sandwiches with the other two pieces of bread. 

Grilled cheese

Spread melted butter over one side of each sandwich. Heat a 12 inch pan over medium-low heat 

When the pan is hot, place the sandwiches (buttered-side down) on the pan. Reduce the heat to low. 

Butter the top side of the sandwiches using the melted butter.

When the bottom of the sandwiches are golden brown and crispy (approximately 5-10 minutes), flip the sandwiches. 

Again, wait for the bottom of the sandwiches to be golden brown and crispy. The cheese should be melted. 

Your grilled cheese sandwiches are now ready...enjoy!

Grilled cheese

Wednesday, September 10, 2014

Cream of Celery Soup

Cream of Celery Soup As the weather begins to change, soup becomes a bigger and bigger part of my diet. Warm, comforting, and easy to make--soups should become a staple in your dinner rotation!

Today's recipe, coming from Bon Appétit Magazine is great because it is easy, delicious, and relies on kitchen staples like celery, potatoes, and onions.

As soon as I had a sip of this soup, I immediately wanted to devour it. Though the cream and the butter in this recipe means it is not the healthiest, it does make for fantastic soup. This creamy soup would make a greater starter for a fall dinner party as well.

Enjoy!

Cream of Celery Soup

from Bon Appétit Magazine

1 head celery, stalks chopped, leaves reserved
1 large waxy potato, chopped
1 medium onion, chopped
1 stick butter
Kosher salt
3 cups low-sodium chicken broth
1/4 cup fresh dill
1/2 cup heavy cream

Combine celery, potato, onion, and butter in a medium saucepan over medium heat. Season with kosher salt. Cook, stirring, until the onion is tender, about 8-10 minutes. Add broth, and simmer for 8-10 minutes until the potatoes are tender.

Cream of Celery Soup

Purée in a blender with the dill. Strain, then stir in cream. Serve with a drizzle of olive oil and celery leaves/dill.

Cream of Celery Soup


design + development by kelly christine studio