Mixpanel

 photo HilaryStoneSoupHeader-ABOUT.png photo HilaryStoneSoupHeader-RECIPES.png photo HilaryStoneSoupHeader-TRAVELGUIDES.png photo HilaryStoneSoupHeader-ESSENTIALS.png photo HilaryStoneSoupHeader-CONTACT.png
Showing posts with label dessert. Show all posts

Tuesday, February 9, 2016

Peanut Butter Brownies for Valentine's Day

Peanut Butter Brownies
It’s only fitting that for Valentine’s Day, this post includes two of my long-time loves, peanut butter and chocolate. The two are a perfect pair, like rainy days and a great book, Kate and William, and bagels and lox.

Both ingredients are heavy players in my diet; peanut butter and bananas, peanut butter on toast, hot chocolate, dark chocolate before bed; there typically isn’t a day that goes by where I don’t have either chocolate or peanut butter.  

I typically eat chocolate and peanut butter separately, but admittedly Reese’s are my favorite drugstore candy item, and I recently fell in love with McConnell’s Double Peanut Butter Chip ice cream. Why not combine the two into brownies?

Peanut Butter Brownies

These peanut butter brownies are perfect for sharing at work, sharing with your Valentine on a hike, and turning into a hot fudge brownie sundae for eating by yourself (which admittedly is me this year as Z is out of town skiing).

My Valentine’s Day will start with laying in bed all day a springboard Pilates class (I’m slowly but surely becoming stronger) and hopefully a massage (thanks to the amazing company Soothe). In the afternoon, I’ll whip up a batch of these brownies again for post-dinner ice cream sundaes.

The first time I made these brownies, I checked to see if they were done, but I was more focused on Downton Abbey  multi-tasking and accidentally dropped a pan of half-cooked brownies on the floor. Oops. So, don’t make the same mistake I did and try to keep up with the Crawley Family while making peanut butter brownies.
  

Peanut Butter Brownies 

From Cook’s Illustrated
Makes about 16 brownies

Note: do not use a natural peanut butter (one where the oil separates from the butter itself). While I never eat Skip or Jiffy, this is the recipe to use it in.

3 ounces unsweetened chocolate, chopped
8 tablespoons unsalted butter, cut into chunks
1 cup sugar
1/2 teaspoon baking powder
1/4 teaspoon table salt
2 large eggs
1 teaspoon vanilla extract
2/4 cup all purpose flour
1/3 cup peanut butter, room temperature

Adjust oven rack to middle position, and preheat the oven to 350 degrees. Line 8-inch baking dish with foil and coat foil with cooking spray. 

Melt the chocolate and butter in small bowl in microwave, or in heatproof bowl set over pan of simmering water, stirring occasionally to combine. Cool mixture for several minutes. 

Whisk sugar, baking powder, table salt, eggs, and vanilla together in medium bowl until combined, about 15 seconds. Whisk in chocolate mixture until smooth. Stir in flour until no streaks remain.

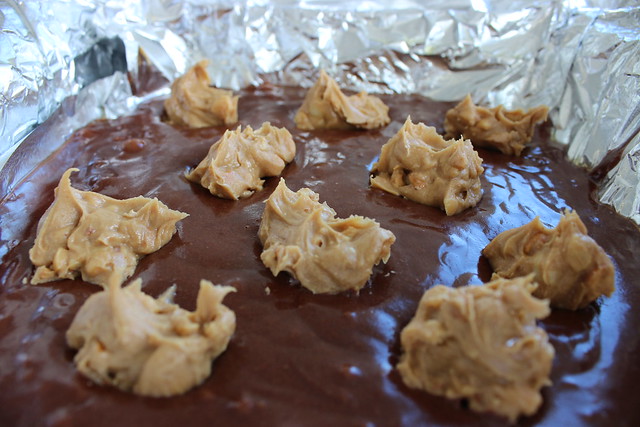
Pour batter into prepared pan. Drop peanut butter in 10 small dollops spread out evenly across the batter. Without touching the foil lining, run pairing knife through batter to create swirls.

Peanut Butter Brownies

Peanut Butter Brownies

Bake until toothpick inserted halfway between edge and center of pan comes out clean, 25 to 27 minutes. Cool brownies on wire rack for 1 hour. 

Peanut Butter Brownies

Using foil, lift brownies from pan to cutting board. Slide foil out from underneath brownies, and cut brownies into 2-inch squares.  

Monday, October 26, 2015

Double Chocolate Banana Bread

Double Chocolate Banana Bread
This week, I'm sharing two loaf cakes that belong on your Halloween dessert table. Today's recipe is a dark as night chocolate banana bread studded with chocolate chips.

For Z's birthday, we stocked up on bananas for toast, and as per usual, we were left with a plethora  of bananas. We bought four times as many bananas as we needed! Instead of letting the bananas go to waste, we froze half, and then put the rest into banana breads. 

Z is big fan of banana bread and chocolate chips, and as soon as I saw this double chocolate banana bread recipe, I knew we had to give it a try. I love how dark the bread turns out, plus the surprising banana flavor. 

Double Chocolate Banana Bread

I baked the chocolate banana bread on a Sunday, with hopes of bringing leftovers into work, but it was so delicious that we devoured the whole loaf that day! It's crazy good. 

Loaf cakes like banana bread make perfect fall treats--they pair great with an afternoon cup of tea, and I love eating them warm out of the oven on a cold day. Oh, and did I mention there's no fancy equipment required, and the prep process takes less than 5 minutes? Another reason to add this into your baking rotation.

 On Wednesday, I'll share another loaf cake that is perfect for Halloween--hint: it's orange and black!


Other recipes you would like:

Double Chocolate Banana Bread

From Smitten Kitchen

3 medium or large very ripe bananas
1/2 cup butter, melted
3/4 cup brown sugar
1 large egg
1 teaspoon pure vanilla extract
1 teaspoon baking soda
1/4 teaspoon table salt
1 cup all purpose flour
1/2 cup Dutch processed cocoa powder
1 cup semisweet or bittersweet chocolate chips

Heat oven to 350 degrees F. Spray a 9x5 inch loaf pan with nonstick cooking spray.

Mash bananas in bottom of large bowl. Whisk in butter, then brown sugar, eggs, and vanilla. Place baking soda, salt, flour, and cocoa powder into a sifter, and sift over wet ingredients. Stir ingredients together, and then fold in chocolate chips.

Double Chocolate Banana Bread


Pour into prepared pan and bake for 55 to 65 minutes, until toothpick inserted into the center of the cake comes out batter free. Let cool in pan for 10 to 15 minutes. Then run a knife around pan, and invert the cake onto a cooling rack. Move the cake right side up. Serve warm (my favorite) or at room temperature.

Thursday, September 10, 2015

Rosh Hashanah Honey Cake

Rosh Hashanah Honey Cake

I warned you last week that fall was just around the corner, and here it is, with a Rosh Hashanah honey cake recipe.

While honey cake was never on my family's Rosh Hashanah table, it is a traditional recipe for the Jewish New Year. My family ate a lot of apples and honey, but honey cake was never on our agenda. To be honest, whenever I had honey cake, I ended up disappointed. It didn't even taste like honey!

Rosh Hashanah Honey Cake

When I saw this particular honey cake recipe in Cook's Country, I knew I had to give it a shot.  The recipe has almost 2 cups of honey in it, and the cake was perfectly sticky and sweet. My taste testers at work devoured the cake quickly, and it is sure to be a star on your Rosh Hashanah table. Plus, it's a pretty simple and straightforward recipe, no fancy kitchen equipment required.

Rosh Hashanah Honey Cake

For those out there who don't celebrate Rosh Hashanah...still make this cake! I love honey cake with tea in the late afternoon, but it would also be a hit for brunch.

Rosh Hashanah Honey Cake

From Cook's Country

Cake:
2 1/2 cups all purpose flour
1 1/4 teaspoons salt
1 teaspoon baking soda
1/2 cup water
4 large eggs
1/4 cup plus 2 tablespoons unsweetened apple sauce
1/4 cup vegetable oil
1/4 cup orange juice
1 teaspoon vanilla extract
1 3/4 cup honey

Glaze:
1 cup confectioner's sugar
4 1/2 teaspoons water
1 teaspoon vanilla extract
Pinch of salt

Adjust oven rack to middle position and heat oven to 325 degrees. Heavily spray 12-cup Bundt pan with non-stick baking spray with flour. 

Whisk flour, salt, and baking soda together in a large bowl. Whisk water, eggs, apple sauce, vegetable oil, orange juice, and vanilla extract together in another bowl until combined. Whisk honey into egg mixture until fully incorporated.

Whisk honey mixture into flour mixture until well combined.

Pour into prepared pan and bake for 45 to 55 minutes, until a skewer inside of the cake comes out clean. 

Let cake cool in pan for 30 minutes, then use rubber spatula to loosen cake from sides of pan and invert it onto a rack. Let cool completely, for about 2 hours.

Whisk all three glaze ingredients together in a bowl. Drizzle evenly over cake. Let glaze firm (about 30 minutes), then serve. 

Wednesday, August 19, 2015

Peaches in Lillet

Lillet Peach Dessert

Phew, finally back from Boston and NYC, and ready to get back to sharing recipes.

Today's recipe is by far the easiest and healthiest dessert I have ever made.

I am very much a dessert fan--cakes, cookies, pudding, ice cream--and I typically believe that dessert should have sugar or flour in it to be considered dessert. This dish of marinated peaches totally changed my mind though.

It means almost every hip and trendy diet. It's gluten-free, paleo-friendly, alkaline diet friendly, and sugar-free. Yet, it is completely satisfying for every sweet tooth out there. I made this at a dinner party where one of my friends was Paleo, and everyone walked away a happy camper!

On top of how healthy it is, this peach dessert is incredibly easy to make. You chop up peaches and basil, add Lillet Blanc (a French aperitif), and then just let it sit in the fridge. It's perfect for hot, end of summer days when the last thing you can imagine doing is turning on the oven or stove.

For those not familiar with Lillet, get familiar! Lillet is a classic French fortified wine, often enjoyed before dinner. I particularly love it in the summer with a twist of lemon.

This peachy treat would be just as good as a late afternoon snack. Add in some warm sun and friends, and life is looking great.

Lillet Peach Dessert

Peaches in Lillet

Adapted from Bon Appetit Magazine

3 ripe peaches, peeled and cut into 1/2 inch wedges (I was lazy and left the peel on)
1 750-ml bottle of Lillet
2 tablespoons thinly sliced basil

Toss peaches, Lillet, and basil in a large bowl. Cover and chill for at least 2 hours. You can let the peaches sit for up to a day before serving. 

Wednesday, July 1, 2015

Watermelon Granita

Watermelon Mint Granita
Happy almost 4th of July! With barbecues and sunshine just around the corner, it's only fitting to offer you a recipe today that is perfect for the 4th of July holiday weekend.

This recipe is actually inspired by a trip to Italy a few years back. In Rome, I fell in love with espresso granita, a slightly sweetened frozen espresso slushy. It was the perfect way to get my caffeine fix for the day while staying cool.

Watermelon Mint GranitaWatermelon Mint Granita

Granitas have a great icy texture, and for Independence Day weekend, a fruit filled treat that you can eat by the pool sounds lovely. I made this version with watermelon and mint, riffing off of last week's salad. 

I love love love the color here--it's a bright pink color that screams summer get-togethers and events. 

There are lots of other things to love about this dish: it's dairy free and gluten free, low in calories, plus, you can make the granita up to 3 days ahead of time! 

Watermelon and Mint Granita

Recipe adapted from Ellie Krieger

9 cups seeded, cubed watermelon
1/3 cup fresh squeezed lime juice
1 cup mint, finely chopped
1/3 cup sugar

Working in two batches, puree the watermelon in a food process or blender. Strain the pureed watermelon into a bowl, making sure to get all the liquid out. Stir in the lime juice, mint, and sugar. Pour the mixture into a 9x13 inch pan. 

Place mixture in the freezer. Every 30 minutes for about 2.5 hours, use a fork to break up the ice crystals and scrape the mixture until it has a coarse texture. Scrape one last time before serving, and spoon into bowls.

Enjoy!

Watermelon Mint GranitaWatermelon Mint Granita

Wednesday, May 27, 2015

Berry Pavlova

Summer Berry PavlovasSummer Berry Pavlovas


This summer berry recipe is an essential to have up your sleeve for a summer barbecue or brunch. When I picture a long and luxurious summer brunch, I imagine pavlovas being served with a pile of fresh berries on top.
Summer Berry PavlovasPavlovas are a meringue shell that's topped with whipped cream and fresh berries. You can make one large pavlova, but I particularly like miniature individual pavlovas. They're elegant and showcase berries perfectly!
Summer Berry PavlovasMeringues can be intimidating, but I promise that with these steps you'll be able to make it happen. I recommend baking the shells the night before, and then putting the whipped cream and berries together at the last moment. 
Summer Berry PavlovasSummer Berry Pavlovas

Berry Pavlovas

From Patricia Wells

1 1/4 teaspoon pure vanilla extract
1 1/4 teaspoons cornstarch
1 1/4 teaspoons distilled white vinegar
5 large, ultra-fresh egg whites, at room temperature
1 2/3 cups superfine sugar
1 cup heavy cream
1 pound of fresh strawberries, raspberries, and blackberries

Chill the mixer bowl and whisk in the freezer for at least 30 minutes. 

Arrange a rack in the lower third of the oven. Preheat the oven to 350 degrees F. Combine vanilla, cornstarch, and vinegar in a bowl until smooth. 

In the chilled mixer bowl, whisk the egg whites on low speed until frothy, gradually increasing the speed, until still peaks form. Be careful not to overheat or the whites may begin to liquefy. 

Add half the sugar to the stiffened whites, a tablespoon at a time, whisking until the mixture seems thick and satiny. 

Add the vanilla mixture to the whites, and with a large spoon gently fold it into the whites, taking care not to knock the air out of the whites. Add the remaining sugar and fold it back into the whites. 

Spoon large dollops of meringue, about the size of a small fist, onto a lined baking sheet. Reduce oven temp to 285 degrees F and bake for 20 minutes. Turn off the oven, and leave the meringues in the oven to cool completely, preferably overnight. 
Summer Berry PavlovasSummer Berry Pavlovas
In the bowl of an electric mixer, whisk the cream into soft peaks. 

When you are ready to serve, pile the cream on top of the meringues, and top with fresh berries. 

Summer Berry PavlovasSummer Berry Pavlovas

Thursday, April 9, 2015

Matzoh Toffee


Chocolate Matzo Toffee


I'm warning you. This stuff is addicting. It's so good, that it's worth making even if you are sick of matzo or you don't have to worry about eating matzo this week!

This is basically matzo covered in a delicious toffee, then chocolate, and then flaky sea salt. It's basically the bomb dot com. 

Chocolate Matzo Toffee
I actually never grew up eating this. It wasn't part of my family's Passover routine. I didn't discover this recipe until college. Now, it's one of my favorite Passover snacks, but really as I'm eating it now I'm wondering why I don't make this all year round.

It's surprisingly easy to make--the hardest part is waiting for the toffee to cool!

Chocolate Matzo Toffee

Matzoh Toffee

From David Lebovitz

4 to 6 sheets of matzo
2 sticks unsalted butter, but into pieces
1 cup packed brown sugar
Big pinch of sea salt
1/2 teaspoon vanilla extract
1 cup semi-sweet chocolate
Flaky sea salt

Line a baking sheet with foil and then parchment paper. Preheat the oven to 375. Line the baking sheet with matzo. 
Chocolate Matzo Toffee

In a pan, melt the butter and brown sugar together over medium heat. Once the butter melts completely, let the mixture boil for 3 minutes. 

Chocolate Matzo ToffeeChocolate Matzo Toffee
Off the heat, stir in sea salt and vanilla into the brown sugar and vanilla mixture. 

Then, pour the toffee mixture over the matzo. Make sure the matzo is covered completely!

Chocolate Matzo Toffee
Turn the oven to 350, and then put the baking sheet in the oven. Let it cook for 15 minutes. You should reduce the heat if it burns.


Take the baking sheet out of the oven, and then sprinkle the chocolate chips over the toffee. Let the chocolate sit for 5 minutes, then spread the chocolate evenly with an offset spatula. Sprinkle with sea salt. 

Chocolate Matzo ToffeeChocolate Matzo Toffee

Now, the hard part. Let the toffee cool completely before eating. Enjoy!

Thursday, April 2, 2015

Back to Basics: Flourless Chocolate Cake

Flourless (Gluten-Free) Chocolate Cake

Passover is almost here, and if your previous celebrations are anything like mine, your Seders probably include some form of cake made with potato starch or matzo meal (to compensate for the lack of flour) that a family friend or relative brought for dessert.

Flourless (Gluten-Free) Chocolate Cake
I always loathe these cakes that look deceptively delicious, but then end up just tasting like a weird potato due to the potato starch. 

During Passover, yes, your diet is limited. You essentially are gluten- and corn-free, and for many Jews, rice and legumes are also a no-no. That being said, it doesn't mean your dessert options are limited!

Flourless (Gluten-Free) Chocolate Cake
My philosophy on Passover desserts applies equally well to any sort of diet that excludes gluten or other key foods. The secret is just to avoid recipes that try to replace flour with something else. There are lots of great desserts out there that don't require flour!

Today's recipe is a rich and perfectly imperfect flourless chocolate cake that will be a perfect addition to your table this weekend, whether you are celebrating Passover, Easter, or just the beautiful spring weather!

Flourless (Gluten-Free) Chocolate Cake
This cake brings a lot of flavor, and I love how rustic it looks. The cake puffs as it bakes, and then cools to almost create a crater of sorts. The recipe comes from Nigella Lawson, who calls this a "Chocolate Cloud Cake". 

I like this cake served with whipped cream, and you can find my recipe for that here

Also, here are some other gluten-free and Passover-safe recipes, like macaroons and chocolate mousse.

Flourless (Gluten-Free) Chocolate Cake

Flourless Chocolate Cake

From Nigella Lawsone
Leaving the recipe in grams, so you can be more accurate!

250 grams of bittersweet (70% cocoa solids) chocolate
125 grams unsalted butter (softened)
6 large eggs (2 whole, 4 separated)
175 grams white sugar

Preheat the oven to 350 degrees F. Line the bottom of a 9 inch springform pan with parchment paper and set aside. 

Melt the chocolate in a double boiler, and then let the butter melt in the warm chocolate. 

Flourless (Gluten-Free) Chocolate Cake
Beat the 2 whole eggs and 4 egg yolks with 75 grams (1/4 cup) of white sugar, then gently add the chocolate and butter mixture. 

Flourless (Gluten-Free) Chocolate Cake
In another bowl, whisk the four egg whites until foamy, then add the rest of the white sugar (about 1/2 cup). Whisk until the egg whites hold their shape, but are not too stiff. I suggest using an electric mixer for this step!

Flourless (Gluten-Free) Chocolate CakeFlourless (Gluten-Free) Chocolate Cake


Lighten the chocolate mixture with a dollop of the egg whites. Then, fold in the rest of the egg whites carefully. 

Flourless (Gluten-Free) Chocolate Cake
Pour into the prepared tin, and bake for 35-40 minutes, until the cake has risen and cracked, and the center is no longer wobbly. 

Cool the cake on a wire rack; it will sink as it cools. 

Flourless (Gluten-Free) Chocolate Cake
Remove the cake from its tin when ready to serve. Add whipped cream or powdered sugar, as desired. 


design + development by kelly christine studio